RME Digiface USB and PipeWire

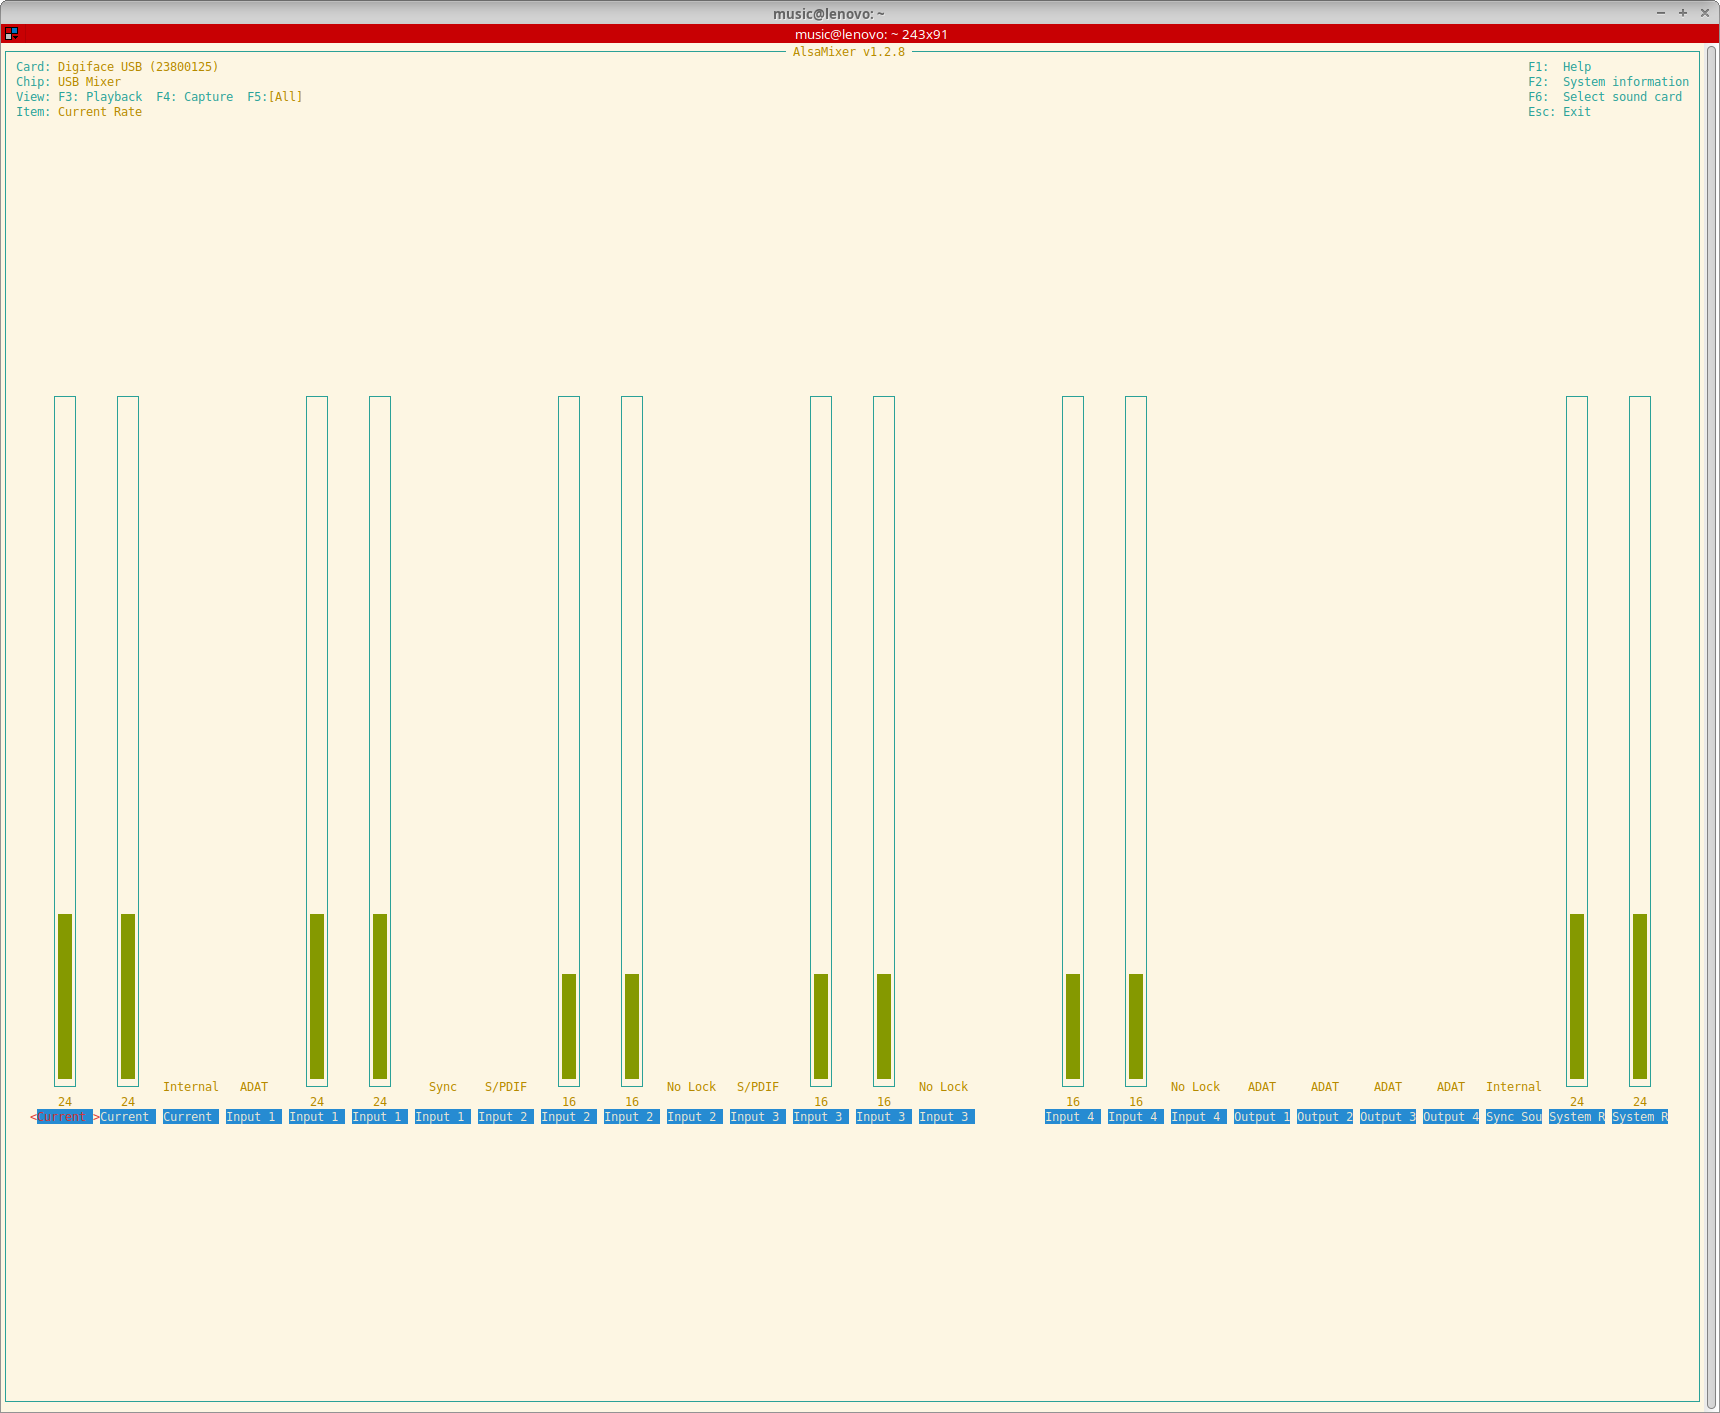
My work laptop provided by SURF, a Dell Pro 14 Premium, runs a custom Dell Ubuntu 24.04 ISO since otherwise half of the peripherals don’t work. Ubuntu 24.04 comes with PipeWire so I was curious if the Digiface would work with such a setup. Well, it does, albeit with some quirks.

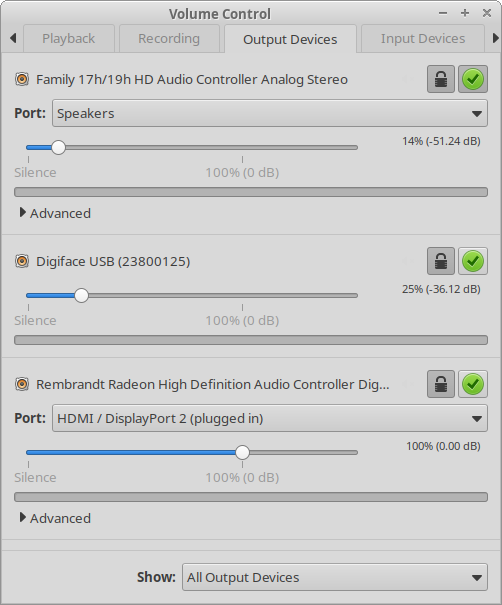
First of all PipeWire also doesn’t get the outputs right. With the help of WirePlumber I could map channels 33 and 34 of the phones output to Front Left and Front Right. But then the next issue popped up: weird garbled, phasing, ringing audio. When using ALSA directly with Ardour this happened too so it’s not a PipeWire issue. Tried tweaking things first and also tried a recent Liquorix kernel. To no avail. Then I started trying out different buffer sizes using pw-metadata and noticed the phasing, ringing sound would go away when changing the buffer size. And I also noticed that the garbled sound would come back if I used a buffer size higher than 64. So with the use of WirePlumber I also set that now. Another owner reported that setting a higher sample rate also alleviates the issue. I still like to figure out though why I can’t use higher buffer sizes. I think it’s related to the USB topology of this laptop as I don’t have this issue on my own laptops.

The WirePlumber configuration file to remap the phones outputs can be found here: https://codeberg.org/autostatic/gists/src/branch/main/99-rme-digiface-usb.lua. Ubuntu 24.04 uses WirePlumber < 0.5.0 so it’s still in Lua format. You can place this file in ~/.config/wireplumber/main.lua.d/. And it starts with 99- for a reason, the interwebs suggest a lower number but then it gets overwritten by global configuration files.

Below the WirePlumber configuration file that I use on the Dell Pro 14 Premium with an extra property to work around the garbled audio issue.

rule = {
  matches = {
    {
      { "node.name", "matches", "alsa_output.usb-RME_Digiface_USB__23800125__7C01A52EA9692C8-00.*" },
    },
  },
  apply_properties = {
    ["audio.position"] = "AUX0,AUX1,AUX2,AUX3,AUX4,AUX5,AUX6,AUX7,AUX8,AUX9,AUX10,AUX11,AUX12,AUX13,AUX14,AUX15,AUX16,AUX17,AUX18,AUX19,AUX20,AUX21,AUX22,AUX23,AUX24,AUX25,AUX26,AUX27,AUX28,AUX29,AUX30,AUX31,FL,FR",
    ["api.alsa.period-size"] = 64,
  },
}

table.insert(alsa_monitor.rules,rule)
RME Digiface USB and PipeWire

Now what does rtcirqus actually do?

To answer that question let’s assume the following:

  • You want to do real-time audio, for instance you would like to do an overdub in a song project by using a MIDI keyboard and a soft synth.
  • You’re using a USB audio interface.
  • You’re experiencing xruns when using lower buffer sizes (64 or even lower) that result in crackling audio.

Basically all components of a desktop computer or a laptop have an IRQ. Let’s say IRQs are some sort of communication lines between the brains of your computer (the CPU) and those components. All these communication lines are more or less the same as in, none of these communication lines has priority over the other. But if you suffer from bad audio quality caused by xruns then giving the communication line that is connected to your USB device more priority than the rest could alleviate the audio issues.

This is where rtcirqus could be helpful. What rtcirqus does is detecting your USB audio interface when it gets connected, then it figures out what the IRQ of the USB bus is that your audio interface is connected to and raises the priority of the IRQ attached to that USB bus. In other words, rtcirqus gives the communication line between the USB bus that your audio interface is connected to and the CPU of your computer a higher priority. This higher priority translates into other communication lines being throttled and giving the communication line of our USB audio interface more room to transfer and receive its audio data.

rtcirqus needs to be able to prioritize that communication line though and this is where the threadirqs kernel option is for, it creates so-called threads of all available IRQs on a computer. Threads are more or less like processes running on your computer, with threadirqs enabled you can list them as such with a command like ps -eLo cmd | grep '^[irq'. So make sure this kernel option has been added to the kernel command line. In case you’re using a real-time kernel this isn’t needed as a real-time kernel uses threaded IRQs by default.

So if you find yourself in such a situation, head over to https://codeberg.org/autostatic/rtcirqus and give rtcirqus a try, maybe it helps you achieving lower latencies with your USB audio interface while retaining a clean audio output signal.

Now what does rtcirqus actually do?

RME Digiface USB on Linux

With the release of the 6.12 kernel the RME Digiface USB is supported under Linux. Since this is a very portable device with lots of IO (32 in and 34 out) it got on my radar as a possible candidate for making recordings at my rehearsal space. It took a while before I stumbled upon a second hand unit but in the end I managed to find one nearby. Hooked it up to my notebook with an up-to-date Liquorix kernel and it worked out of the box.

A lot of thanks go out to Asahi Lina for adding support for the RME Digiface USB to the 6.12 kernel. She even added the possibility to control the output format and clock source and to monitor sample rates, input formats, input sync statuses and the current sync source.

Screenshot of AlsaMixer showing all the controls available for the RME Digiface USB

Have yet to test the Digiface USB with more than one ADAT device but with one device (a Behringer ADA8200) everything seems to work really well. Did some round-trip latency tests and with a buffer size of 16 samples and putting TotalMix in DAW mode (which had to be done on a different OS unfortunately but saved another 0.2 ms) I got it down to approximately 4.2 ms. Systemic latency with a buffer size of 16 samples and a sample rate of 48 KHz is 2 ms so somewhere a bit more than 2 ms of additional latency gets added. I think about 1.4 ms gets added by that converters if I did my maths right. According to the specs of the converters they add 22 samples (10 in and 12 out at 48 KHz). That leaves about 0.8 ms unaccounted for. Probably the USB bus buffer or something in the driver stack. Well, no real deal-breaker for me.

This image has an empty alt attribute; its file name is image-2.png
Ardour round-trip latency measurement with a buffer size of 32 and a 48KHz sample rate

Because I’m still on Debian 12 I couldn’t fully use the device with PulseAudio though. PulseAudio only supports devices with up to 32 channels in or out and since the Digiface has 34 output channels PulseAudio refused to output any audio through it. As a fix I added the following to the ~/.asoundrc file in my home directory:

pcm.snd_rme_digiface_usb {
    type multi
    slaves.rme.pcm "snd_output"
    slaves.rme.channels 34
    bindings.0.slave rme
    bindings.0.channel 32
    bindings.1.slave rme
    bindings.1.channel 33
}

pcm.snd_output {
    type hw
    card USB23800125
}

To make PulseAudio pick up this extra snd_rme_digiface_usb device I added the following to ~/.config/pulse/default.pa:

# RME Digiface USB
load-module module-alsa-sink device=snd_rme_digiface_usb

And now I can select the Digiface as an output source and use the phones output in a desktop session.

Screenshot of pavucontrol with the RME Digiface USB right in the middle

Another big bonus is the custom pouch my daughter made for it. I can now toss it in my bike bag without having to worry about dings or scratches.

RME Digiface USB tucked in a custom cotton pouch
RME Digiface USB on top of its custom cotton pouch

RME Digiface USB on Linux

Hang loose!

As of June 1st I will start a new adventure at SURF! I’m extremely grateful that I can be a part of this fantastic organization. It took me almost 20 years to get an appointment, I first applied there in June 2005 when it was still called SARA. Third time’s a charm I guess, I also applied for a position back in December but since that was for a storage specialist there wasn’t a full match.

Looking forward to starting there. Back to the field of education and research, I worked in that field before at the University of Amsterdam for 8 years back in the 00s. It feels like the circle is complete, at the UvA I tried really hard to get a Linux position but I was deemed too light for every application I did. But now almost 15 years later with a lot more experience and a solid resume I really was a valid contender for this position, for which I’m happy and also a bit proud.

I’m assigned an Specialist Engineer position within the internal operations team, in my case specialist as in Linux specialist. Work location will be the SURF location at the Science Park in Amsterdam, close to the infamous CWI. Can’t wait to have a daily Linux driver again instead of running a non-sanctioned OS with FreeRDP to be able to access my backlog. But first, document everything, improve and update existing documentation and transfer as much knowledge as possible to my current team members. And also migrate all Ubuntu 20.04 machines and getting the whole software stack to run containerized.

Hang loose!

Using Vim with ALE for Python linting and autocompletion

At work we use VS Code but if possible I would prefer not to use that on my work station at home. Since I’ve been apt purging nano for ages I started looking for a way to do this with Vim. In the end it turned out to be quite simple on my Debian Bookworm install.

Prerequisites

You will need the following packages:

  • vim
  • flake8
  • python3-pylsp
  • vim-ale

Install them with sudo apt install vim flake8 python3-pylsp vim-ale.

Configuration

Add the following lines to your .vimrc and you should be good to go!

syntax on

packadd! ale
let g:ale_completion_enabled = 1
let g:ale_linters = {'python': ['pylsp']}

On Ubuntu the situation is a bit different, the linter to add for autocompletion is called pyls but the executable is called pylsp. So to have ALE load the correct executable some extra configuration is needed.

syntax on

packadd! ale
let g:ale_completion_enabled = 1
let g:ale_linters = {'python': ['pyls']}
let g:ale_python_pyls_executable = 'pylsp'
Using Vim with ALE for Python linting and autocompletion

Turntables II

Ran into a SL1210MK2 for about the same price as a new Super OEM on a Dutch second hand market place so went for that. And it was only a 30km drive. It’s quite a battered specimen but the core parts work properly. I did make an appointment with a repair service to take a good look at it. The tone arm connector is worn out and has too much slack, the target light doesn’t work and I’d like to have the RCA cables replaced with better quality ones. And it has some kind of quick start cable that I would like to have removed. And the dust cover is pretty tatty and missing its hinges.

It came with no headshell, the seller offered the original but I declined since I already have an unused original headshell lying around and I was planning on putting a premounted Ortofon 2M Red on it anyway. Got that one in already, together with a nice Tonar Cork ‘n Rubber mat. Also ordered a Rega Fono Mini A2D phono preamp. This model comes with a builtin ADC with a Texas Instruments PCM2900C chipset, so 48kHz/16-bit. This can be very handy for spinning with time coded vinyl, no need to add an extra audio interface to the chain. And yes, already played around with that using Mixxx which works amazingly well.

Turntables II

Turntables

What are the options these days when it comes to buying a new turntable that comes closest to what I already have without having to pay over 1000 Euros? So direct-drive, sturdy, reliable and decent sounding? Enter the Hanpin Super OEMs as they are called. These are the higher level Technics SL-1200 copies that are being branded under a myriad of different names:

  • Pioneer PLX-1000
  • SYNQ XTRM1
  • Reloop RP-7000 MK2
  • Reloop RP-6000 MK5 S
  • Omnitronic 5220/5250
  • Audio-Technica AT-LP1240
  • Mixars STA
  • Stanton ST-150

These are apparently all the same Hanpin DJ-5500 model with slightly varying features. Out of the above list only the Pioneer, SYNQ and Reloop RP-7000 MK2 models are currently available. But which one to choose? Inching toward the Reloop since that turntable has a height adjustable tone arm and personally I think it looks the best of all three contenders. But then this DJ-5500 design is like over 15 years old and apparently has some issues (hum with certain elements, anti-skating not working correctly) so maybe I should just go for another second hand SL-1200?

Argh, why didn’t I buy both SL-1200s back when I bought mine, together they were 700 Euros…

Turntables

Running your own Mastodon instance with Docker

This is on a Ubuntu 22.04 server. Install the necessary Docker packages first.

sudo apt install docker-compose-v2

Add a mastodon user with UID and GID 991.

sudo groupadd -g 991 mastodon
sudo useradd -u 991 -g 991 -m -d /srv/mastodon -s /bin/false mastodon

Now cd to /srv/mastodon, clone the Mastodon repository and check out the current version.

git clone https://github.com/mastodon/mastodon.git .
git checkout v4.2.8

Build the Mastodon image and set correct ownership of the public directory.

docker compose build
sudo chown -R mastodon: /srv/mastodon/public

Now run the Mastodon setup step.

copy .env.production.sample .env.production
docker compose run --rm web rake mastodon:setup

Fill in the necessary details but leave the Redis password blank. Make sure the (sub)domain you want to use has a proper DNS record. The setup outputs a set of variables, copy and paste those into .env.production after having deleted the old content. Since this file contains credentials you could chmod 400 it so only the user firing up the Docker setup has read access.

Start the Mastodon stack.

docker compose up -d

And verify all containers come up healthy. Now you can put your Mastodon instance behind a reverse proxy. I’m running Apache myself and the configuration below works for me. Bear in mind it relies on a working Let’s Encrypt certificate, you will have to create one yourself.

<VirtualHost *:80>
        ServerName mastodon.yoursite.net
        ServerAdmin yourname@yoursite.net
        AssignUserID mastodon mastodon # Only applicable when using MPM-ITK

        DocumentRoot /srv/mastodon

        <Directory />
                Options FollowSymLinks
                AllowOverride None
        </Directory>

        Redirect permanent / https://mastodon.yoursite.net/

        ErrorLog ${APACHE_LOG_DIR}/mastodon.yoursite.net.error.log

        # Possible values include: debug, info, notice, warn, error, crit,
        # alert, emerg.
        LogLevel warn

        CustomLog ${APACHE_LOG_DIR}/mastodon.yoursite.net.access.log combined

</VirtualHost>


<VirtualHost *:443>
        ServerName mastodon.yoursite.net
        ServerAdmin yourname@yoursite.net
        AssignUserID mastodon mastodon # Only applicable when using MPM-ITK

        ProxyPreserveHost On
        ProxyPass /api/v1/streaming http://localhost:4000/
        ProxyPass / http://localhost:3000/
        ProxyPassReverse / http://localhost:3000/

        RequestHeader set X-Forwarded-Proto "https"

        SSLEngine on
        SSLProxyEngine on
        SSLCertificateFile      /etc/letsencrypt/live/mastodon.yoursite.net/cert.pem
        SSLCertificateKeyFile   /etc/letsencrypt/live/mastodon.yoursite.net/privkey.pem
        SSLCertificateChainFile /etc/letsencrypt/live/mastodon.yoursite.net/chain.pem

        # intermediate configuration, tweak to your needs
        SSLProtocol             all -SSLv3 -TLSv1 -TLSv1.1
        SSLCipherSuite          ECDHE-ECDSA-AES128-GCM-SHA256:ECDHE-RSA-AES128-GCM-SHA256:ECDHE-ECDSA-AES256-GCM-SHA384:ECDHE-RSA-AES256-GCM-SHA384:ECDHE-ECDSA-CHACHA20-POLY1305:ECDHE-RSA-CHACHA20-POLY1305
        SSLHonorCipherOrder     off
        SSLCompression    off

        # HSTS (mod_headers is required) (15768000 seconds = 6 months)
        Header always set Strict-Transport-Security "max-age=15768000"

        ErrorLog ${APACHE_LOG_DIR}/mastodon.yoursite.net.error.log
        CustomLog ${APACHE_LOG_DIR}/mastodon.yoursite.net.access.log combined
</VirtualHost>

Reload Apache and visit your Mastodon instance with the admin account you created. The result of these steps can be found here: https://mastodon.autostatic.net

References:

Running your own Mastodon instance with Docker